Sunday, April 09, 2006

Lone Cypress Tree at Pebble Beach, Monterey, CA


This Cypress tree has stood in Monterey, CA for almost 100 years. It is a thing of beauty!! Every time I've gone to photograph it I find something different about it. It is one of my favorite places in the world to take pictures!

Copyright 2006 C. Filloramo

To View a PhotoShop Image Screen Size, Try This!

In my PhotoShop lessons, you will find an image to guide you alone. There is a lot of detail in that image. In order to see the image larger and see more detail just double click on the image and it will become almost full screen.

To get to a posted PhotoShop lesson of your choice, click on the Previous Posts section

ADJUSTMENT LAYER PAINTING


I have a technique for you to try to gain more control over your images. You already know most of it, so let’s do the process step by step.

Open your image
Create an adjustment layer>CHOOSE THE HALF BLACK AND WHITE CIRCLE IN THE LAYER PALLET
Go to adjustment layer button in the layers palette.
Set the foreground and background boxes (under tools) to black and white.
Make sure the adjustment layer is selected (it will be blue)
Choose the paint brush (foreground box should be BLACK)
Now paint back YOUR ADJUSTMENT.
Choose different opacities for different effects.
Choose WHITE for the foreground box and paint back the B+W

You can do this with any adjustment layer you create. It is called Adjustment Layer Painting

Tuesday, April 04, 2006

To Flatten an Image the Fast Way, Try This!


Go to your layers tab and click on the black triangle on the right side. Choose flatten layers and all your layers will flatten.

When to flatten layers. If you are uploading images to a web site that makes prints, most consumer sites will not let you upload a Tiff or PSD image format. It would take too long to upload. You will need to flatten the images before you do the upload.

This is the fastest way to flatten the layer. Why go to “layers” on your menu bar when you can click on the layer dock and do the same thing.
Another tip when uploading to a web site that makes prints. If you are working in a “Adobe 1998” color space you should convert the color space to Srgb color space. Most if not all photo lab printing machines work in a Srgb color space.

Most digital cameras default to a Srgb color space.

How to Paint an Image with the History Brush in PhotoShop


Open an image in PhotoShop
Choose the history brush from the tool menu
In the “mode section” you can choose a variety of effects using the history brush to paint different effects with the history brush.

To take it a step further, try this!

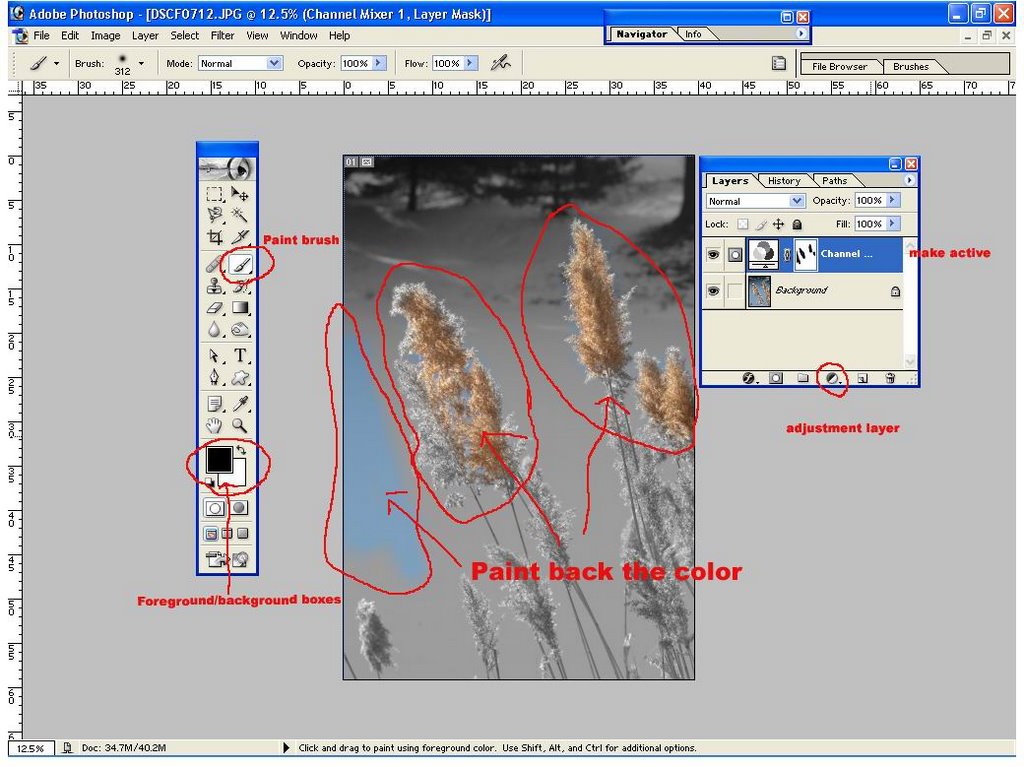
Create a duplicate background layer. On the background layer create a layer mask.
Clicking on the image on the background copy, use the history brush to paint in an effect. To change that effect, click on the layer mask in the background copy.
Choose the brush tool and using the foreground/background Black and white squares you can paint back the history brush effect using different opacity values for an expanded effect.

**There are two ways to make the history brush work.
1.) Make your crop, save the file, close the file, then open the file.
Now you can use the History brush tool.
2.) Make the crop>go to the history tab and remove the history brush tool from the snapshot and put it on the crop line. Now you can use the History brush tool.